
Cherishing Your Ginger Jar Patterns with Care
Oh, the charm of ginger jars! Those delightful, bulbous beauties often add a touch of historical elegance to homes. With an origin rooted far in ancient craftsmanship that stretched back at least several centuries, these jars aren’t just containers; they are in a sense pictures. And what a treat! Each one carries its own story, taken from old books or whispered on through time by craftsmen of centuries past. So how does one maintain the charm of these hand-painted treasures? Let’s go off onto a whimsical journey over cleaning tips, with a bit of humor thrown in and heaps sympathy for our subject.
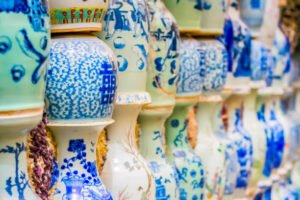
Imagine this: You have a ginger jar that bears a pattern straight out of an ancient Chinese landscape painting—waterfall cascading down, phoenix flying mid-flight. of China’s magnificent designs are full TLC than a paperweight on your desk. But never fear Keeping them pristine isn’t exactly rocket science. Just as you wouldn’t wash a china teapot or your grandmother’s lace curtains without care left over from making said garment your in the other hand holding scrub brush, ginger jars call all our old-time best manners into play.
First and above all, remember using cleaning cloths matter what type it is. Here microfiber really does help the situation. It’s soft and gentle, and though can cradle those intricate patterns without a single scratch. Have you ever tried to wipe down something with one of those paper towels that feels like sandpaper? Right, then now think on it more carefully. Remember always these pieces of art are as delicate as cats in hot places and handle them with soft touches.
But let’s talk about dust. It’s our never-ending story, right? Keeps coming back like that one pesky aunt at family gatherings who just won’t leave. Well, uninvited you might say. Dust loves to settle on ginger jars, intricately weaving its fibers into the valleys of every design. Fighting this pesky intruder is essential with one’s regular dusting. Use that soft microfiber cloth and gently pat down the jar, Like offering a friendly greeting to someone at work you ( kind of ) actually don’t want to hug.
And now there are cleaning solutions to consider. Occasionally plain warm water with just a touch of mild dish soap will be plenty. Avoid anything too strong–like Tabasco in your breakfast cereal. A gentle going over is often the best medicine. Dip your cloth into the solution, wring it out (no stories only exemptions), and softly clean all around jar, moving in circular motions. Act as if you were carefully tickling it to life!
Copy: Never–I mean never–immerse these jars completely in water. Think of it as having a vampire on vacation in Ibiza for the first time and him do one night stand one any of local prostitutes: exposure to too much Sun can really harm them. Humidity and moisture creeping in may slowly dull those beautiful patterns more surely than the latest twist in any romance movie. On this side address each spot at a time as though cleaning weeds one by one out of a garden.
How to mend All those Cracks and Chips in Ginger Jars
Ginger jars are made from crockery or ceramics. They go round and round and you see every age dramatically reflected there because the whole process–unique in its world–has been written into the clay layer by layer. But with time, those bad boys bear the scars of age : cracks or chips that may one day spell disaster for even these immortal treasures. Here’s your survival guide to reviving an aged container.
Like this: You just inherited your grandmother’s favorite jar–an intricate little thing that adorned her mantel for years She loved it as she’d love anything else with which to give more love. then. One day, though guess what. There’s a crack running right down middle. Before you toss it up in the attic, remember that there’s still hope. Yes, really.
Let’s first assess the damage. If it’s just a barely visible scratch, then you’re in luck–a delicate touch-up with paint that matches the jar color from a crafts store or online should be all that’s needed. A dab here, a dab there and presto! An instant facelift without heavy bills.
But what if that little bit could take on the role of starch-yellow thimble ( what with China and all ) or crack wide enough to swallow a pencil? Some additional TLC is required in such cases; possibly also a bit of originality. That doesn’t mean, however that this DIY rescue mission will leave your cherished jar at someone else’s mercy for weeks on end. We’re going to fix this ourselves!
Shouldn’t these You have to keep the broken pieces? For larger chips, it’s time to whip out the super glue. Make sure you get a brand that dries clear unless you want your patch job standing out a mile away. Leave subtlety up to the glue. Start by washing the area. Cleanliness guarantees good bonding, which sorta matters here. Apply the glue cautiously; use enough to stick but not so much it runs all over. When you’ve got your section glued back on, hold it calmly for a minute or two. This is about as close to meditation as you get with these jars.
In the case of cracks, similar steps but you’ll also need an adhesive that’s up to the job. The likely hero in such an operation is two-part adhesive. It’s tough stuff, but it must be mixed right like any good margarita. So mix well but be quick about it–it goes tacky almost quicker than peanut butter on a sticky day. Put some on both sides of the crack and press it together perfectly for a good seal. Let the thing dry completely, which means no peeks at your handiwork for at least till next morning.
And if you feel like having a little fun ( or maybe if you want to deceive yourself as well ), try a gold or silver paint pen to cover hairline cracks. The old art of Japanese Kintsugi–where in gold filled into cracks –turns a flaw into an attribute and makes the jar a new story.


