
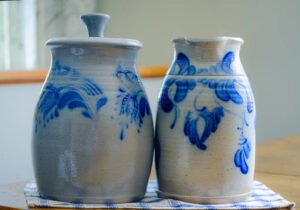
Enliven Your Home Decor: Create Your Own Ginger Jar Designs
In life, what’s better than getting to do whatever you want? Achieving that is like a pot of warm tea that’s been brewed on a rainy day—it both soothes and excites. Basic supplies you need to begin the journey are quite simple: first and foremost, select your plain ceramic ginger jars. They are your blank page – a snow-swept field or a table for the next artist to breakfast. In addition you need paint brushes—thin ones for detailed work; chunky ones mainly used in this project for sweeps of color; also buy porcelain paints because ordinary acrylics don’t hack it.
Before you even think of adding color, get your designs in order. You don’t want to end up with something that resembles a young child’s attempt at finger painting, although they can be quite charming. Traditional ginger jars can carry flower patterns, pasage-inilline lizard beasts, or intricate and complex geometric designs. Take inspiration from the masterpieces or make up your own designs! This setp is like putting all the puzzle pieces ojn the relevant table before you actually begin the jigsaw.
This is a little horror story from my own experience. I tried to paint koi on a ginger jar and ended up with tadpoles having an underwater dance party. Don’t follow in my footsteps! Do your sketches!
Now at last we start adding color to the pale designs there on your jar. First, go over the outlines with black or dark blue paint—This will set off colors well later. Keep as steady a hand as you can when doing this, and if possible move your eyes slowly up from left to right and then back again. Sometimes the brush for no good reason will momentarily take control. Chat with it, reason with it, let it lead you.
Outline done, jump in and fill them with color- Here boldness in going for striking reds and deep blues or golds that shine. Go for a blending of two colors if you feel daring. Think of your jar as a tapestry telling your story, stitch by stitch — or rather, dab by dab.
Here’s a little inside information: It’s all in the layers. Like peeling an onion but much more fun! Always let each layer dry before doing the next one if you don’t want them to mix into a mudlike mess. And after all, what could convey as much character as a dozen different color layers that set your jar off like a firecracker at an athletic match?
Finishing painting, it comes time for the best part of all— adding details and highlights. Maybe some flowers have tiny beads of dew on their petals, or your dragon breathes little jets of fire. Such little realities of life bring a forth-right human depth. Think of them as the cherry on your artistic biscuit on.
Lastly, a coat of clear glaze is needed to protect your masterpiece. This step is like putting on your raincoat before stepping into the storm. This will make your work shine out in world where all of life’s lights are shining.
Dive into Ginger Jar Painting: Making Your Masterpiece
So, you’ve tumbled into the charming rabbit hole of ginger jars. Instigators of delight, they have seen many seasons in the world since the Ming Dynasty. They’ve been in museums and your friend’s house–smug and satisfied, sitting there as if they could see their own reflection. Only the sunny life of an artist will do for you. Well, hold your horses just yet! First, let’s work out everything you need to be prepared for this leap into creative endeavor.
The first one to come to mind – a ginger jar. An obvious choice. But can you believe that jars are definitely not made equal? Get one without too much detail so you can sign your own name on it. Maybe have an old teapot that needs new life. Great starting point! As a last resort, you could buy a new one today from some shop or other. There are all kinds of shapes and sizes available so just pick the one that you feel speaks to you. When you first start out, let not your cost be too high nor yet your way too difficult to tread. After all, many times simple choices lead to the most brilliant solutions.
Then there are the paints. You need vivid, long-lasting (and preferably blendable!) colors. The Best Friends Forever people in this case are undoubtedly acrylics. They’re pliable and they dry before you can say “Whoopee!” before putting the sheen. Before you smother the jar in those beautiful colors, first test a few color swatches on a piece of paper or other material. Of course, that old thing about how wise it is to try the water before you dive in comes to mind here.
Your next great purchase: brushes. Think of them as the wands of your magic. A good selection will serve you best–small ones for detail, wider ones to cover large areas. Also, going for good quality might not hurt anyone’s feelings because nothing is more bitter than an accidental wild hair ruining your creation.
We should not forget about palettes. Mixing colors before putting them down on the jar shows you if the pot is going to stew up goulash or Sherbet Party. It’s like predicting a storm before it breaks. A bunch of old plates can be used if you’re trying to pinch every penny you’ve got! Only remember, the cleaner your palette when you mix colors, the better the result.
The surface is another consideration. You wouldn’t go rock climbing without some handy equipment, would you? Keep newspapers or an old piece of cloth close by for this purpose. Not only will they shield the furniture you have carefully selected for your abode from chaos and ruin caused by creativity at work, but also it helps to save some hum-drum cleanup later on.
Another vital player in your team—a sealer. Seal your work to keep the colors bright. It’s like a coat of arms against the unceasing movement of time and wear—clear acrylics or varnish, depending on your desired final look. Wet-looking and smooth; dry but slightly rough–it’s up to you!
Pencils and erasers are tools you should have. If you draw your design on a piece of paper first, it can keep you from crying over spilt colors mid-painting. A pencil is necessary so that any mistakes can be gently wiped out. Get ’em while they’re hot, because in spite of everything, mistakes are just happy accidents if put right quickly.
Got some ideas in mind? Lightly sketch them onto the jar. As you move into uncharted territory, think of it as leaving behind a trail of crumbs.Hard enough to follow, but just faint enough to rub out.


